How To Fix ‘ERR_INTERNET_DISCONNECTED’ Error

Unable to connect to the internet Google Chrome can’t display the webpage because your computer isn’t connected to the internet ERR_INTERNET_DISCONNECTED”

Are you stuck on this page?  This means your internet connection is lost. Or you are disconnected due to some reason. You can either spend your time playing a game or do something to solve the issue.

This error mainly causes due to google chrome itself or your wireless network device problem. Sometimes it’s because of overprotecting antivirus software.You can try to restart your computer but as many said this isn’t working for them.

Also check your router or any other internet device, by connecting it to a different device.If your internet connection is working properly and still you are facing the issue, we have some solutions to it. go through the article and this will help you to resolve your issue.

ERR_INTERNET_DISCONNECTED

Understanding ERR_INTERNET_DISCONNECTED:

ERR_INTERNET_DISCONNECTED is an error message that appears in your browser when it fails to establish a connection to the internet. It disrupts your online experience, preventing you from accessing websites and online services.

This error message can occur in various web browsers, including Google Chrome, Mozilla Firefox, Microsoft Edge, and others.

It usually indicates a network issue between your computer and the internet, or problems with your internet service provider (ISP). Understanding the possible causes behind this error is crucial for effective troubleshooting.

Read Also:

  1. Err_Cache_Miss
  2. Discord No Route
  3. Steam Content File Locked

Causes of ERR_INTERNET_DISCONNECTED:

Several factors can trigger the ERR_INTERNET_DISCONNECTED error, and identifying the root cause is essential for finding the right solution. Here are some common causes:

  1. Network Issues: Temporary network interruptions or disconnections between your device and the internet can lead to this error. This can be caused by a variety of factors, including unstable Wi-Fi or wired connections, router problems, or ISP issues.
  2. Proxy Server Misconfiguration: If you use a proxy server, misconfigurations or server unavailability can result in connectivity problems and the ERR_INTERNET_DISCONNECTED error.
  3. DNS Problems: Domain Name System (DNS) issues, such as incorrect settings or DNS server unavailability, can prevent your browser from resolving web addresses.
  4. Firewall or Security Software: Overly restrictive firewall settings or security software might block your browser’s access to the internet, causing this error.
  5. Browser Cache and Cookies: Accumulated cache and cookies in your browser can occasionally lead to connectivity issues.
  6. ISP Problems: Sometimes, the issue may be on your ISP’s end, such as network outages or maintenance.

How to Fix Error ERR_INTERNET_DISCONNECTED? 

Go through these methods, you will find something to solve your issue. Follow all the steps carefully to get rid of this problem immediately.

Method 1: Fix Local Area Network Settings

Many users have faced this problem because of unwanted changes in the local area network setting. You can follow these steps to modify those setting to solve your problem of ERR_INTERNET_DISCONNECTED Error.

Step 1: At first use the shortcut key Windows key + X to open up the control panel.

Step 2: Further inside the control panel, click on the internet option. You can change the view to small icons if you couldn’t find it.

Step 3: Now, click on the Connection tab. Under the connection tab, you will see LAN settings. Click on that.

Step 4: Here untick every option and then click on the ok button.

Step 5: Finally restart your computer and check if the issue gets resolved.

Method 2: Clearing Browsing Data

When you visit any website, some files get saved as Cookies and caches. This browsing data can also create the problem of Error ERR_INTERNET_DISCONNECTED.

Clear this data to solve the problem. Follow the steps below to clear browsing data. Clear Browsing Data on Firefox:

Clearing browsing data from Firefox is easy.

Step 1: You need to press the shortcut key Control + Shift + Delete. Now you will see one window with the option clear.

Step 2: Click on that clear now button. Finally, restart your computer.

Clear Browsing Data on Google Chrome:

Step 1: At first go to the address bar on the chrome browser. Here type ‘chrome://history inside’

Step 2: Further click on the option clear browsing data.

Step 3: Here you need to check all the boxes inside the window.

Step 4: Finally click on the clear browsing data again.

Step 5: Now, restart the chrome and see if it’s working or not.

Method 3: Reinstalling Antivirus

Many people have noticed that uninstalling their antivirus software has helped them. To uninstall your antivirus, follow the steps below.

Step 1: At first go to the Control panel. You can search for it in the search box.

Step 2: Further click on the suggestion. Now, here click on the Programs and feature.

Step 3: Now, click on the Uninstall a program.

Step 4: Alright now check if you can access the internet.

Step 5: if you can access the internet then reinstall your antivirus or switch to any other antivirus software.

Method 4: Delete WLAN Profiles (Wireless Profiles)

If still, you are struggling with the issue, try deleting WLAN profiles.

Step 1: At first press the shortcut key Windows + X and open the command prompt. Run Command prompt as an administrator.

Step 2: Further l

Step 3: Now, type this command to remove all WIFI profiles. Type the command ‘netsh WLAN delete profile name= [PROFILE NAME]’

Step 4: Alright now,

Step 5: Now, connect to only your WIFI.

Some Easy Methods to Fix ERR_INTERNET_DISCONNECTED:

Now that we’ve identified potential causes of the ERR_INTERNET_DISCONNECTED error, let’s explore effective methods to troubleshoot and resolve this issue:

  1. Check Network Connection:
    • Ensure that your device is connected to the internet, and check for any physical issues with your router or modem. Restarting them can often resolve connectivity problems.
  2. Disable Proxy Settings:
    • If you use a proxy server, temporarily disable it and check if the error persists. Ensure your proxy settings are configured correctly.
  3. Flush DNS Cache:
    • Open Command Prompt as an administrator and enter the command ipconfig /flushdns to clear the DNS cache, which can resolve DNS-related issues.
  4. Disable Firewall or Security Software:
    • Temporarily disable your firewall or security software to check if they are causing the error. If the error disappears, adjust the software settings to allow your browser access to the internet.
  5. Clear Browser Cache and Cookies:
    • In your browser’s settings, clear the cache and cookies. This can help resolve issues related to cached data.
  6. Use a Different Browser:
    • Try accessing websites using a different web browser to determine if the error is specific to one browser. If it works in another browser, consider reinstalling the problematic browser.
  7. Reset TCP/IP Settings:
    • Open Command Prompt as an administrator and run the commands netsh int ip reset and netsh winsock reset to reset TCP/IP settings, which can fix network-related problems.
  8. Contact Your ISP:
    • If none of the above methods work and you suspect the issue is with your ISP, reach out to their customer support for assistance. They can check for network outages or connectivity problems on their end.

Read Also:

  1. ERR_NAME_NOT_RESOLVED
  2. ERR_NETWORK_CHANGED
  3. ERR_SSL_VERSION_INTERFERENCE

Conclusion

In most cases ‘ERR_INTERNET_DISCONNECTED Error’ is caused by either a WIFI problem or a chrome error. Before trying these methods just restart your computer once. We hope these methods will help you to solve your issue.
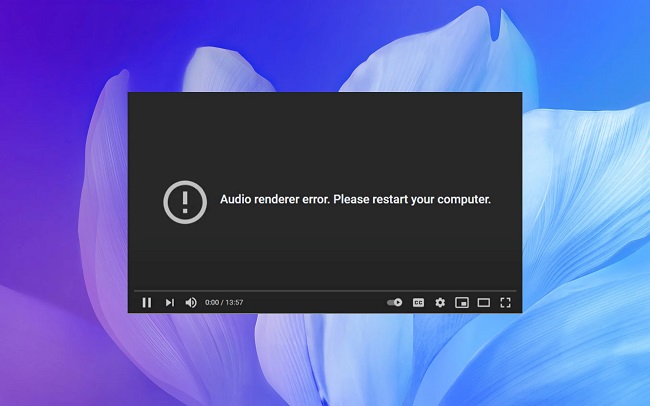
Fix ‘Audio Renderer Error Please Restart Your Computer’

Are you stuck with the problem “Audio renderer error. Please restart your computer.”? Many other users are facing this problem. Irrespective of your browser or windows version, you can face this issue.

In this article, we are discussing some causes of this issue and solutions to overcome the problem.

Audio Renderer Error Please Restart Your Computer'

What Causes the ‘Audio renderer error. Please Restart Your Computer.’ Error?

We are listing here some causes of this issue based on our research. From this, you will get some idea about this error.

Read Also:

  1. Discord No Route
  2. Err_Cache_Miss
  3. Steam Content File Locked

1. Audio Driver Glitch

This problem is related to the motherboard of your system. You can temporarily get rid of it by unplugging the audio set and plugging it back in after few seconds. You can also try to restart your system and disabling the audio driver for some time.

2. A Conflict Between the Windows Sound Drivers and ASIO Driver

If you are using a windows sound driver and ASIO driver with different sound format frequencies, this can cause the Audio Renderer Error. Synchronizing both the driver can help you.

3. Bugged BIOS Version

If you are facing this problem on the Dell computer, updating it to the latest BIOS version will help you.

How to Fix Audio Renderer Error ‘Please Restart Your Computer?

Here are some methods to solve the “Audio renderer error. Please restart your computer.”. Go through the methods one by one and solve your issue.

Method 1: Unplug/Plug Headphones

If you are facing any issues while playing a video on YouTube, then this simple method might help you. It’s a better solution if you can fix the issue by simply unplugging your external device like headphone and plugging it back in.

Many people have solved this issue simply by this method. But remember, this is not the final solution. If you are facing the issue again and again then you need to do something for a permanent fix.

Method 2: Restarting Your Computer

The error itself suggests this solution. Restart your computer and see if the issue gets resolved or not. Many people said that restarting the computer has helped them as a temporary solution.

Some of them getting this issue recurringly. They are getting this error message every 30-40 seconds.

Method 3: Running The Audio Troubleshooter

You can get the help of an inbuilt troubleshooter of the windows. It has some programs to fix many audio-related problems. If this issue falls into those common problems, running the troubleshooter can fix your issue.

Follow the steps to run the troubleshooter.

Step 1: At first open the run dialog box. You can use the shortcut key Windows + R.

Step 2: Here type ‘ms-settings: troubleshoot’ and press the enter button. This will open your troubleshooting window.

Step 3: Further search for the ‘Playing Audio’ now click on it.

Step 4: Now, click on the run troubleshooter to open the utility.

Step 5: Here wait till the process is complete. Then search for the device causing the problem and select it. and press the next button.

Step 6: Further click on the prompting repair strategy.

Step 7: Finally restart your computer and check if the issue is still occurring or not.

Method 4: Disabling & Re-enabling the Audio Driver

This is another method to fix the “Audio renderer error. Please restart your computer” error. For this, you have to disable the audio adapter in your device manager and then re-enable it.

Follow the guide to disable and re-enable the audio driver.

Step 1: At first open the run box by pressing the key Windows + R.

Step 2: Now, type ‘devmgmt.msc’ and hit the enter button. This will open your device manager.

Step 3: Further expand the ‘Sound, video and game controllers’ menu.

Step 4: Alright now, right-click on the audio adapters and choose to disable the device.

Step 5: Here wait for some time. Then enable all the devices one by one.

Step 6: Finally restart your computer. Check if it is working fine or not.

Method 5: Rolling Back/uninstall The Audio Driver

You might face this problem because of some corrupt files. Rolling back to the previous audio version can solve your problem. You can try uninstalling the audio driver, it will solve the issue while reinstalling it.

Follow the steps to rolling back the audio driver.

Step 1: At first open the run dialog box by using the key Windows + R.

Step 2: Now, type ‘devmgmt.msc’ and hit the enter button. This will open the device manager.

Step 3: Further search for the ‘Sound, video and game controllers drop-down menu’. Now double click on the audio adapter.

Step 4: Here go to the properties tab. Now, click on the driver tab and select Rollback driver. You can also click on the option to uninstall the device if available.

Step 5: Finally restart your computer.

Your computer will automatically reinstall the latest audio driver. Now check if your system is working fine or not.

Method 6: Setting the Same Sample Rate For Both Windows Sound Driver and ASIO Driver

If there are mismatched frequencies between the Windows Sound system and the ASIO driver, this can cause the issue Renderer Error ‘Please Restart Your Computer.

You will face the issue when you open Cubase. If you can synchronize these frequencies, you can manage to solve the error. Follow the guide to do it

Step 1: At first open the run dialog box. You can use the key ‘Windows key + R’.

Step 2: Now, type ‘mmsys.cpl’ in the dialog box and hit the enter button to open the sound setting menu.

Step 3: Further go to the playback tab. Here selects your audio device. Click on the Configure.

Step 4: Alright now go to the properties and select the advance tab. Here you need to change the Default Format to 16 bits, 44100 (you can choose another too).

Step 5: Now, click on the apply and save it.

Step 6: Great! Now open your ASIO drivers setting. Select the audio option.

Step 7: Further change the sample rate same as step 4 frequency.

Step 8: Finally restart your computer. Check if it is working fine.

Method 7: Update BIOS 

If you are using the dell computer, the issue might be with BIOS firmware. Some users were facing a problem with the old version. Updating the latest BIOS firmware can help you to resolve this issue.

To update the BIOS firmware, follow the official guide of the dell computer website. Once you have understood the guidelines, you can easily update your old BIOS version.

Read Also:

  1. ERR_NAME_NOT_RESOLVED
  2. ERR_NETWORK_CHANGED
  3. ERR_SSL_VERSION_INTERFERENCE

Conclusion

Many users have solved their problem of ‘Audio Renderer Error ‘Please Restart Your Computer’’ using these methods. Try these solutions to overcome this issue. We hope this article will help you.

How to Fix ‘Steam Content File Locked’ Issue

Nowadays, getting an error message while downloading or updating the game on Steam is a common issue. Not everyone but most of the people face this issue. You will see the error like

An error occurred while updating ‘game name’ (content file locked)

We understand this is irritating, but not to worry this article will help to fix this issue in no time.

Steam Content File Locked

Understanding Steam Content File Locked:

The “Steam Content File Locked” error is a common issue that Steam users encounter when attempting to update or launch a game. It typically occurs when Steam is unable to access or modify certain files related to the game’s installation.

This error can be frustrating as it can disrupt your gaming experience and leave you searching for a solution.

It’s important to note that this error can manifest differently for different users, with various error messages, but the underlying issue is the same – Steam is unable to access the necessary files.

Read Also:

  1. FreeFlix HQ
  2. AnimeNova
  3. Audio Renderer Error Please Restart Your Computer

Causes of Steam Content File Locked:

Several factors can contribute to the Steam Content File Locked error, and understanding these causes is crucial for effective troubleshooting:

  1. Antivirus or Firewall Interference: Overly aggressive antivirus software or firewall settings may block Steam from accessing or modifying game files, triggering the error.
  2. File Permissions: Incorrect file permissions can restrict Steam’s ability to modify or access game files. This can occur due to user settings or system configurations.
  3. In-Progress Updates: If Steam is currently updating a game or a download is in progress, attempting to launch or modify the same game can result in this error.
  4. Corrupted Cache or Files: Corrupted cached files or game files can prevent Steam from functioning correctly and lead to the error.
  5. Third-party Software Conflicts: Other software running in the background may interfere with Steam’s operations, causing the error to occur.
  6. Game Files in Use: If the game or its associated files are currently in use by another process, Steam may be unable to modify or access them.

How to Fix Steam Content File Locked Error?

We are listing here 4 methods to solve this problem. Follow the steps properly to solve it.

Method 1: Run Steam As Administrator

Sometimes windows prevent Steam from updating the game. But running Steam as an administrator can solve this issue. Follow the steps below to run Steam as an administrator.

Step 1: At first, open your task manager. You can search for task manager in the search bar.

Step 2: Here you need to find the Steam Client Bootstrapper process. Once you get it, click on it and then click on the end task button.

Step 3: Now, close the task manager window.

Step 4: Further, right-click on the Steam icon on the desktop (you can do it as per your system).

Step 5: Alright, now you will see the list of options. Here, choose the option run as an administrator.

Step 6: This step will start the stream, now download and install the update.

Method 2: Opt Out Of Beta

For some games, the problem of ‘content file locked error’ occurred because of opting for a beta for games on Steam.

Step 1: At first boot up the Steam.

Step 2: Further, choose the option library. You will see this in the horizontal options.

Step 3: Now, here right-click the game, because of that this error occurs.

Step 4: Alright, now click on the properties tab.

Step 5: Further select the Betas tag.

Step 6: Finally click on the dropdown list. Here selects the beta you would like to opt into, then select none opt-out of all beta programs.

Step 7: Now try to update your game.

Method 3: Add Game In Steam Directory As An Antivirus Exemption

It might be the case; your antivirus software is preventing the updates. In that case, we need to set the game directory as an exception. We are using Avast, as it is the most popular antivirus software. You can refer to another process according to your antivirus software.

Step 1: At first, close the Steam.

Step 2: Now, open your Avast software. For that right-click on the icon and select the option open Avast user interface.

Step 3: This step will open the Avast window. Now, click on the menu and go to the settings option.

Step 4: Here click on the General section. Under the General section select the option Exception.

Step 5: Further, click on the Add exception button and choose the game folder. Generally, you will find it at the location, C: Program Files (x86)SteamSteamappscommon’name of the game’.

Step 6: Now, click on the Add Exception button.

Step 7:  Further, repeat the process for ‘Steam.exe’. you will find it at location C: Program Files (x86)Steam.

Step 8: Alright, now open the Steam. Go to the library section and here right-click on the game name. select the properties option.

Step 9: Now, click on the Local files and then select the option to verify the integrity of game files.

You can also try this another method:

Step 1: At first, right-click on the Avast icon. Now move your cursor over the Avast shields control.

Step 2: Here select the 10 minutes.

Step 3: Further open the Steam and let the update complete.

Step 4: Finally, switch on the shield again.

(If this is not allowing you to update your game then, you need to check the integrity of files associated with the games as above.)

Method 4: Winsock Catalog Reset

Winsock (windows API) manages the communication between the OS and network protocol such as TCP/IP. The API needs reset sometimes. This could be the reason for the Content File Locked Issue. You can use the following steps to reset Winsock.

Step 1: At first, type the cmd in the search bar. And then press the keys Ctrl+Shift+Enter and open the Command prompt as administrator.

Step 2: Now, in the command prompt write, ‘netsh Winsock reset’. Click on the enter button.

Step 3: Finally restart the PC when prompted.

Step 4: Now, open Steam and try to update your game.

Read Also:

  1. SockShare
  2. SubsMovies
  3. ERR_SSL_VERSION_INTERFERENCE

Conclusion

We understand, having a Content File Locked error while downloading the game is irritating but these methods will solve your problem. Read and apply all the steps carefully.

How To Fix ‘ERR_SSL_VERSION_INTERFERENCE’ Error In Chrome

When you try to open and browse any website, you may receive an error message that reads “ERR_SSL_VERSION_INTERFERENCE.” This problem is related to website SSL certificates.

Before we look at how the issue arises, it’s important to grasp what it means. SSL stands for “Secure Sockets Layer,” which is a technical word.

The Secure Socket Layer (SSL) is critical for transmitting data via TCP sockets. Google Chrome also uses it to communicate with websites that are significantly more secure, such as Facebook, YouTube, and others.

How To

The “ERR_SSL_VERSION_INTERFERENCE” notice appears on your computer screen whenever Google Chrome fails to load a website that uses the SSL protocol. This problem has been present since the beginning.

Other possible causes include incorrect time and date settings on your PC, an earlier version of Google Chrome installed on your PC, messed up browsing data or cookies, antivirus or antimalware interference, and Chrome’s Hardware Accelerator turned on.

Read Also:

  1. Discord No Route
  2. Steam Content File Locked
  3. Audio Renderer Error Please Restart Your Computer

How to Resolve the ERR_SSL_VERSION_INTERFERENCE Error Chrome has an error.

Well, the issue isn’t a major one. It’s a simple problem to fix. You’ve come to the right place if you’re looking for answers to the “ERR_SSL_VERSION_INTERFERENCE” problem.

Below, we’ve compiled all of the available options for you. You can try each one until the problem is resolved. So, let’s get this party started.

Method 1: Use Windows to check the time and date

After the ERR_SSL_VERSION_INTERFERENCE displays in Google Chrome, the next thing to do is verify the current date and time in your windows. You can accomplish so by shifting your gaze to the bottom extreme right corner of your monitor’s taskbar.

To verify sure the date and time are right, compare them to the time and date on your phone or a nearby clock. Continue to the next solution if they are correct and match each other.

If this is not the case, follow the on-screen directions to correctly adjust your time and date. Although you can manually set the date and time on your computer, it is highly advised that you configure the date and time to be updated automatically.

Bring your mouse to the date and time panel and click on it to manually set them. Select “change date and time” from the little window that appears. Follow the instructions below to automatically set the date and time:

Step 1: Click on the start option on your monitor or press the start key on your keyboard to launch it. When you choose the “settings” option, a settings window will appear on your monitor.

Step 2: Select the time and language settings option from the options menu. Make sure the sliders for Set time automatically and Set time zone automatically are on the right side when the next window with time and language options displays.

Step 3: Restart Chrome and attempt loading the site that was previously displaying the “ERR_SSL_VERSION_INTERFERENCE” error message.

Method 2: Disable Antivirus/Firewall Software

This solution has already been employed by a number of people who have successfully resolved a similar “ERR_SSL_VERSION_INTERFERENCE” issue. Disable any third-party antivirus, firewall, or antimalware software you may have installed on your computer.

If you temporarily disable the software and then restart Chrome, it is possible that you may be able to visit websites that you were previously unable to access due to the notice.

And if you can access the website, it’s likely that the third-party antivirus was the source of the problem, interfering with SSL. Following the answer, you have two possibilities.

To begin, you can turn off your antivirus firewall or antimalware programme anytime you merely want to visit the website.

Second, you can uninstall the antivirus firewall you’re now using and replace it with more dependable software that won’t cause Chrome to display a “ERR_SSL_VERSION_INTERFERENCE” message.

The second option is a complete failure because you have no way of knowing which software will not interact with SSL. You’ll have to try every anti-virus programme available until you find the one that works best for you.

Method 3: Turn off TLS 1.3

If you see the “ERR_SSL_VERSION_INTERFERENCE” error when operating a website, deactivating TLS 1.3 could be a lifesaver. If you want to do so, follow the instructions outlined below.

Step 1: Type “chrome:/flags/” in the address bar of a newly launched Google Chrome window and push enter. This will take you to Chrome’s flag choices.

Step 2: In the flag search box, type TLS. A TLS1.3 option will appear on your screen when you’ve done so. Click the disable option in the dropdown menu, which is generally set to default. When you click it, a relaunch option will display on your computer, prompting you to restart Chrome and pick it.

Visit the page again after Chrome has resumed to see the “ERR_SSL_VERSION_INTERFERENCE” warning. If the problem persists, consider one of the following options.

Method 4: Clear Browsing Data

The loading of a website might be hampered by cached data in a browser. As a result, the next step is to delete all of your browser data and history. Although this process appears to be straightforward, it has previously yielded reliable results.

Simply follow the instructions and procedures one by one to fix the “ERR_SSL_VERSION_INTERFERENCE” notice on your website.

Step 1: Open Google Chrome and select the three vertical dots on the far right-hand side of the screen. You must select the settings option from the chrome menu.

Step 2: Go to the Google Chrome advanced settings in the second step. To access Google Chrome advanced settings, go to Chrome’s settings menu and select advanced from the drop-down menu.

Step 3: Go to the privacy and security section in the next window. Click the clear browsing data button as soon as you locate it.

Step 4: In the following window, check the boxes next to all of the options that display on your screen. Select the all-time option from the time range dropdown menu.

When you’ve completed all of the procedures listed above, you’ll be able to delete all of your browsing history and cookies. To use the website again, restart your Chrome browser. If the website is still unavailable, try the next option.

Method 5: Use the Chrome Clean-up Tool

Chrome includes a built-in Chrome cleanup tool. Instead of seeing your Chrome, the software cleans your computer by scanning for and removing any unwanted malware.

You simply need to download it and perform the scan; the tool will then display any malicious programmes that have been installed on your computer.

You can quickly remove and reinstall those programmes from your PC once they’ve been discovered. To do so, follow the steps outlined below.

Step 1: Open Chrome, select the settings option from the three vertical dots on the top right-hand side, scroll down until you locate the advanced option, and click it.

Step 2: Select the cleanup computer option from the reset and cleanup area. You’ll be directed to the cleanup tool as a result of this. To use the tool, go to the “search” option.

If you don’t want Chrome to gather information about detected malware, system settings, and processes, move the slider to the left under the option “report details to google.”

Once the malicious programmes have been identified, you can uninstall or remove them from your computer.

After restarting a computer and reopening Chrome, look for the issue after visiting the website that was displaying it previously. If the problem persists, try the following method.

Method 6: Update Chrome

When the notice “ERR_SSL_VERSION_INTERFERENCE” appears on your screen, it does not necessarily mean that the fault is with your machine. Another issue could be an older version of Chrome installed on a new PC.

You must look for any updates available to remove this from the checklist. I like to double-check that a promise is current and, if it isn’t, to update it as quickly as feasible. Follow the steps outlined below to do so.

Launch Google Chrome, then select the help option from the three vertical dots in the top right-hand corner. When the help menu displays on your screen, select the about Google Chrome option.

A new window will open in your Chrome as soon as you click on the About Google Chrome option. Chrome will immediately begin looking for a new version of Chrome in this window.

If a new version is available, Chrome will prompt you to choose one of the available updates. Restart Chrome after the update is complete and look for the issue again. If the issue persists when you open the webpage, Google Chrome should be reset.

Method 7: Reset Chrome

By resetting Chrome, you will return it to the state it was in when you originally installed it. The steps to reset it are outlined below.

Step 1: Follow the same procedures as method 4 to open the Chrome advanced settings menu.

Step 2: Go to the Reset and Clean Up section and look for it. Select the option to restore settings to their original defaults. A dialogue box will open, requesting permission to reset the browser. Allow it and patiently wait for the reset to finish.

Step 3: Once the recent procedure is complete, restart Google Chrome and look for the issue by visiting the same website again.

Method 8: Disable Hardware Acceleration

Chrome has a hardware acceleration function that allows you to speed up your browsing speed. However, it is possible that when you try to operate a website, the “ERR_SSL_VERSION_INTERFERENCE” warning will show.

As a result, in the final solution, we’ll show you how to disable the hardware acceleration option, which has shown to be effective in resolving this issue for many customers.

Step 1: Open Google Chrome and navigate to advanced settings using the same techniques as approach 4.

Step 2: Search for the system section and, once you’ve located it, look for the option to enable hardware acceleration when it’s available.

Step 3: Make sure the slider is on the left side to disable it.

Read Also:

  1. Err_Cache_Miss
  2. ERR_NETWORK_CHANGED
  3. ERR_INTERNET_DISCONNECTED

Conclusion

If you’ve tried all of the procedures listed above and are still having trouble accessing a website, it’s likely that the website’s SSL certificate has expired.

You may confirm this by viewing the site using a device other than your computer, and if the problem persists, there is nothing you can do. Thank you for coming to us for assistance.

How To Fix ‘ERR_NAME_NOT_RESOLVED’ In Google Chrome

In today’s world, everyone is connected via computers and laptops. They’ve become an important element of everyone’s lives because they work and support a variety of everyday base operations to gather data and process your daily operations.

However, as previously said, these gadgets are electronic equipment that are prone to faults, which could harm your system or cause delays in your work. ERR_NAME_NOT_RESOLVED is one such error that could cause you problems.

How To

This error occurs in your online browser, and it is most commonly observed in Google Chrome. ERR_NAME_NOT_RESOLVED is a generic error code that indicates that the browser is unable to resolve the domain name.

When this circumstance develops, DNS (Domain Name System), which is in charge of resolving all domain name difficulties, normally resolves the ERR_NAME_NOT_RESOLVED error.

As previously stated, the ERR_NAME_NOT_RESOLVED error happens in Google Chrome and prevents you from opening the webpage. However, with a better understanding and expertise, you may fix the ERR NAME NOT RESOLVED error and improve the efficiency of your browser.

To begin, we must comprehend the sources of the ERR_NAME_NOT_RESOLVED problem. It usually happens when your system is unable to access DNS, resulting in unresolved Domain Name difficulties. This error could also be caused by router issues or incorrectly configured internet settings.

Read Also:

  1. Discord No Route
  2. Steam Content File Locked
  3. Audio Renderer Error Please Restart Your Computer

Understanding ERR_NAME_NOT_RESOLVED:

The ERR_NAME_NOT_RESOLVED error is an issue that arises when your browser, in this case, Google Chrome, is unable to resolve or translate a web address into a corresponding IP address.

Without the correct IP address, your browser cannot locate the website you’re trying to access, resulting in an error message.

This error typically indicates a DNS (Domain Name System) resolution problem, which is crucial for translating user-friendly URLs into machine-readable IP addresses.

While the error message remains consistent, its underlying causes can vary, making it essential to diagnose and address these issues effectively.

Causes of ERR_NAME_NOT_RESOLVED in Google Chrome:

Several factors can contribute to the ERR_NAME_NOT_RESOLVED error in Google Chrome. These causes may range from temporary issues to more complex network configurations.

Identifying the specific reason for your error is crucial to applying the right solution. Here are common causes:

  1. DNS Server Problems: Your computer relies on DNS servers to translate domain names into IP addresses. If the DNS servers are slow, unresponsive, or misconfigured, the error can occur.
  2. Incorrect DNS Settings: If your DNS settings are manually configured and contain errors, Chrome may struggle to resolve domain names correctly.
  3. Cache and Cookies: Accumulated browser cache and cookies can sometimes lead to DNS-related issues. Clearing them might resolve the error.
  4. Router or Modem Issues: Your router or modem may have temporary issues that affect DNS resolution. A simple restart of these devices can often help.
  5. Extensions or Add-ons: Some Chrome extensions or add-ons can interfere with DNS resolution. Disabling or removing them might resolve the issue.
  6. Firewall or Antivirus Settings: Overly strict firewall or antivirus settings can block DNS requests, causing the error. Adjust these settings as needed.
  7. ISP Issues: Your Internet Service Provider (ISP) might encounter DNS problems that temporarily affect your connection.

In Google Chrome, How Do You Fix ERR_NAME_NOT_RESOLVED?

But don’t panic; in this post, we’ve explored remedies that may be able to assist you in resolving the ERR_NAME_NOT_RESOLVED problem, and they’re both useful and straightforward to implement. So, stay tight for the article that will assist you in overcoming the error.

Method 1: Clear the Host Cache in Google Chrome and turn off Predict Network Actions.

The website’s final answer is to clear Google Chrome’s Host Cache. Cookies save a lot of information from a website in a browser like Chrome. To refresh it, go through the procedures below to clear the Host Cache.

Step 1: Open Google Chrome and select Settings from the drop-down menu.

Step 2: Select Advanced Settings from the drop-down menu, then Privacy.

Step 3: To optimise page load performance, disable Predict network activities from the list of choices. After then, shut the window.

Step 4: In the Title Bar, type chrome:/net-internals/#dns and clear Host Cache.

Method 2: Update DNS Server Addresses

There may be instances when you try to open a website or a webpage on your device and receive an error message. However, if you open the same website on a different device with a different connection, you will be able to access that website or pages.

The ERR_NAME_NOT_RESOLVED problem occurs when your device’s DNS is down or unavailable to resolve domain name difficulties, which can be a pain for you and your system.

But fear not, Google has provided a Public DNS server that can assist you in getting your DNS back on track. Follow the instructions below to resolve the ERR_NAME_NOT_RESOLVED error.

Step 1: Open the Run command by clicking Windows and then Run.

Step 2: Type cpl and press OK over there.

Step 3: A new tab appears; right-click on Network Adapter and pick Properties from the drop-down menu. Choose Internet Protocol Version 4 and then Properties from the drop-down menu.

Step 4: Verify your DNS Server Address and replace it with the addresses 8.8.8.8 and 8.8.4.4.

Step 5: Finally, perform a DNS test.

Method 3: On a Mac, Update DNS Server Addresses

We’ve only talked about Chrome so far, and it’s solely a solution for Google Chrome users. Now we’ll talk about the answer in Mac OS, which is an Apple Inc. product.

Many Mac users encounter the message ERR_NAME_NOT_RESOLVED, which can prevent them from accessing the website or pages they seek. They are also experiencing the same issue, which is that the DNS server is down and unavailable.

So, in this article, we’ll show you how to update DNS server in Mac OS by following the steps below.

Step 1: Select the System Preference option from the Apple Icon.

Step 2: Next, select Advanced Settings from the Network drop-down menu.

Step 3: Next, select the DNS tab and push the Add symbol. Then add 8.8.8.8 and 8.8.4.4 to the list of addresses. If there are any other addresses, remove them as well.

Method 4: Update Name Servers

When you create a website, you must go through a number of procedures as part of the process. Filling up your website’s Domain Name is one of these formalities.

This procedure is critical because, as previously stated, if the domain name has a problem, it will not allow you to open your site, which will be a mistake on your part.

Now, if you go to GoDaddy or any other company that offers a platform for you to build your website. They usually assist you in resolving your domain name, and there are no issues as they walk you through the procedure.

Furthermore, these websites enable you to receive timely nameserver changes, ensuring that your domain remains alive for a long time and maybe assisting your website’s functionality.

If you’re still getting the ERR_NAME_NOT_RESOLVED error, try the following:

Step 1: Open Run by clicking on Windows.

Step 2: In the search box, type cmd and hit Enter.

Step 3: A new tab will open, where you should type nslookup your-site.com and press Enter.

Step 4: You’ll be able to tell if your domain name is valid this way. If you haven’t already, create a new account to avoid the ERR_NAME_NOT_RESOLVED warning.

Read Also:

  1. Err_Cache_Miss
  2. ERR_NETWORK_CHANGED
  3. ERR_INTERNET_DISCONNECTED

Conclusion

All of the methods given here will assist you in resolving the ERR_NAME_NOT_RESOLVED problem. As previously said, this type of issue is extremely prevalent, thus following ways may be useful in dealing with it. I hope this information is useful to you.

How To Fix ‘Discord No Route’ Error

Discord is the most famous software among the people for Voice over Internet Protocol (VoIP). It is a community of 250 million registered users.

Now a day’s discord users are facing No Route Error, because of this error people are unable to join the voice channels. In this article, we are discussing the causes of Discord No Route Error and the solutions to overcome this problem.

What is Causing the Discord No Route Error?

These might be some causes for the Discord No Route error.

Read Also:

  1. Doublelist
  2. LetMeWatchThis
  3. Audio Renderer Error Please Restart Your Computer

1. Changed IP address of your PC

If you have a dynamic IP address, that changes regularly then this could be the reason for the error. Here you need to simply reboot your system.

2. Antivirus/firewall might be preventing discord

If your antivirus is stopping the discord, it will lose the connection with outside servers.

3. Use of VPN

Since starting discord is compatible only with the VPN having User Datagram program (UDP).

4. Discord is blocked by the network admin

Usually, at school or workplaces, they blocked such applications.

5. Your voice region may not be incompatible

If you are trying to connect with the server located on a different continent, this can create the issue of no route error.

6. QoS doesn’t work with your network

Some network doesn’t support high-quality packages. But you can disable it from the voice and video sets.

How to Fix No Route Error on Discord?

We are listing here some methods to solve the problem of No Route Error. Follow the steps carefully to resolve your problem. Try these methods on your private network.

Method 1: Restart Modem + Router + Computer

If your IP address is dynamic, your IPV6 connection can be disrupted. This problem can be solved just by rebooting your system. Reboot your system and check if the issue is resolved or not.

You can also try unplugging the power cable and then plugging it back.

If the error is still there, try the next solution.

Method 2: Uninstall 3td party firewall or whitelist Discord (if applicable)

As we have discussed in the causes, your Antivirus software or firewall may be preventing discord from outgoing connections.

It’s hard to find out if your security solution is causing the error or not. But you can try by uninstalling your antivirus software. Uninstall your antivirus software and check if the discord is working fine or not.

You can follow these steps to do it.

Step 1: At first press the shortcut key Windows + R. it will open up the Run dialog box.

Step 2: Further type ‘appwiz.cpl’ in that box and hit the enter button. This will open the Programs and Features window.

Step 3: Now, inside the window scroll down and search for the antivirus software.

Step 4: Further right click on the antivirus software and choose to uninstall.

Step 5: Finally with the same technique, remove every leftover file.

Step 6: Reboot your system and check if the issue is solved or not.

Method 3: Remove your VPN or use one with UDP (if applicable)

From the start, discord is designed to run with the VPN having UDP (User Datagram Protocol). If you are using a VPN service that isn’t compatible with the UDP, you will face the No Route Error.

Talking to your VPN service provider about UDP compatibility can help you. You can also try to disable the VPN service for a while. Then check if discord is running without error or not.

If the problem is resolved after disabling the VPN, you can choose another VPN service. Keeping the ‘anonymity service’ disable can also help you.

If this wasn’t an issue then go to the next method.

Method 4: Verify whether Discord is blocked by your network admin

Most of the schools and workplaces block some sites. If you are facing the same issue then the following steps might help you.

Step 1: At first press the shortcut key, Windows + R. it will open up the Run box.

Step 2: Now, type ‘control’ in the run box to open the control panel.

Step 3: Further click on the Network and Internet tab. Now search for the Network and Sharing Center. Here click on the hyperlink associated with the private network.

Step 4: Now, click on the properties. Here, under the networking tab, choose the Internet Protocol Version 4 (TCP/IPv4) and click on the properties.

Step 5: Alright now, go to the DNS server setting and change the value of Preferred DNS server to 8 8 8 8 and the value of Alternate DNS server to 8 8 4 4.

Step 6: Great! Now save the changes.

Step 7: Finally close your all windows and reboot the system. Now check if discord is working fine or not.

Method 5: Change the server’s voice region

This might be the case in the different continent regions. If the server has a different voice region than your server, you will face this issue.

For that ask the admin of the server, you are trying to connect to set a different voice region. For that, he can go to the server setting and then to the server region.

Method 6: Disable QoS from Voice & Video Settings

This is another method to solve the issue. Some systems are not compatible with the high package priority quality of service. Disabling the Qos from voice and video might help you. Follow the steps below to do it.

Step 1: At first open the discord software. Now, look at the bottom left corner. Here click on the gear icon.

Step 2: Further click on the app settings and search for the Voice and video.

Step 3: Now, here search for the quality of service. Disable the toggle button near it.

Step 4: Finally close all the open windows. And check if the discord is working fine or not.

Method 7: Flushing the DNS setting

Resetting your IP configuration can help you to solve the issue. To do that you need to run some commands in the command prompt. Follow the steps to run the commands.

Step 1: At first, use the shortcut key Windows + R to open the run box.

Step 2: Here type the ‘cmd’ in the run box. Now open the command prompt as an administrator.

Step 3: Further type the ‘ipconfig /release’. This will release your current IP configuration.

Step 4: Now, type the next command ‘ipconfig /flushdns’. And press the enter button.

Step 5: Here type the command ‘ipconfig /renew’. This will renew your IP configuration.

Step 6: Finally reboot your system.

Read Also:

  1. GoMovie
  2. PrimeWire
  3. ERR_SSL_VERSION_INTERFERENCE

Conclusion

There are many issues, that can cause the Discord No Route Error. Many users have solved their issues using these methods. We hope this will help you to resolve your problem too.

How To Fix ‘Err_Cache_Miss’ Error In Google Chrome

The author of this article will explain what Err_Cache_Miss is, why it occurs, and how to solve it on your Google Chrome browser. The “Err_Cache_Miss” error is caused by a number of factors that combine to make browsing difficult.

This issue can also appear in the “confirm form resubmission” dialogue window; it usually displays after pressing the back or refresh button, along with an error page and a primary error message..

Error

This error usually displays when your Google Chrome is experiencing caching issues. It appears on the screen when the browser encounters an issue with the cache of a website or online application.

The issue can be caused by a variety of factors, including faulty extensions, bugs, bad code, or browser settings in Google Chrome.

It usually occurs as a result of a more technical issue when the browser’s cached data is sent to the servers, and if the cache data does not respond, your browser will respond with an Err_Cache_Miss error.

Although there is no direct issue with the browser, problems with the caching website data on the system occur when the website is coded incorrectly or when extensions clash with the website’s proper operation.

In Google Chrome, how to fix Err_Cache_Miss

The good news is that you can get rid of the cache error. There are numerous solutions to resolve this issue, just as there are with any other browser issue.

I’ve included a few methods below. Don’t worry if one solution didn’t work; try another to see if it solves your problem.

Read Also:

  1. M4uFree
  2. ERR_NAME_NOT_RESOLVED
  3. ERR_CONNECTION_TIMED_OUT

Method 1: Reload the Page.

This solution will undoubtedly work if the error is caused by network issues such as low connectivity, shaky connections, network switching while the web page is loaded, and so on.

After an error, the first and most important thing to do is reload the page. To resolve the error, simply use the F5 key or click on the reload symbol beside the address bar.

Method 2: Resubmitting Form Data

When you submit the form, it may fail for a variety of reasons, including a weak Internet connection or the server’s unavailability. When you use the back button on Chrome in this situation, you’ll see the message Err_Cache_Miss.

This is due to Chrome not being able to access the form’s cached content. You should re-complete the form and re-submit it.

Method 3: Delete Data from the Browser

If you have damaged data and a lot of websites, you should delete your browsing data by doing the following:

Step 1: Open Google Chrome and press CTRL + H to open the browser history. Then, on the left side of the screen, choose the clear browsing data option.

Step 2:Check all of the checkboxes and then select the clear data option.

Step 3: This will delete all of your internet history.

Step 4: Reopen your browser to see if the problem has been resolved.

Method 4: Install the latest version of Google Chrome.

It’s possible that the current browser you’re using is an older version with issues that cause the Err_Cache_Miss error. As a result, it’s a good idea to check the current version and, if necessary, upgrade it.

As a result, you can resolve issues like these by updating your browser to the most recent version.

Method 5: Reset Your Browser

If the error persists despite the above-mentioned fixes, it could be due to incorrect browser settings or setups. But, if you aren’t aware of the problem’s cause, what is it? After that, you can clear your browser’s cache.

Step 1: Select Settings from the control menu.

Step 2: Scroll to the bottom of the page and select Show advanced settings from the drop-down menu. After that, select Reset settings.

Step 3: Verify your decision. The settings on your browser have been reset.

Step 4: Last but not least, restart the browser.

You can also try resetting your Chrome browser to its default settings by copying and pasting “chrome:/settings/resetProfileSettings” into your browser’s URL bar, then clicking the “Reset” button.

Method 5: Using Bookmarks to Get to a Website

Chrome may have rewritten the cache with the new unavailable answer when the bookmarked URL is no longer available. The cache miss error will appear as a result. Make sure you’re not using bookmarks to get to the page.

Otherwise, the error message “Err_Cache_Miss” appears. Copy the URL from the bookmarks and open it directly from the Chrome address bar to solve the problem. If it doesn’t work, the site owner may have redirected the URL to a new page.

You should also update your bookmarks to reflect the new URL.

Method 6: Disable One Or More Browser Extensions

The error could be caused by issues with Google Chrome’s settings and configurations, extensions, caching system, and so on. Some browser extensions can influence or prevent it, resulting in difficulties while loading the page.

To do so, examine the Google extensions to see what’s causing the problem, and then take the steps below to disable the extensions.

Step 1: Open Chrome’s control menu, which is located at the top of the screen. Select More tools and then Extensions from the drop-down menu. A drop-down menu will appear with a list of extensions. Disable any ad blocking extensions or toolbars to see if the problem has been resolved.

Step 2: If not, you can figure out which extensions are causing problems by disabling and enabling other extensions. It is recommended that you enable or disable extensions one by one and check the results. The problem with Err_Cache_Miss will be resolved.

Method 7: Disable Google Chrome

Step 1: Right-click on the Chrome shortcut icon and select Properties.

Step 2: Type “-disable-prompt-on-repost” in the target field (no quotes after chrome.exe)

“C:Program Files (x86)” is an example.

Google\Chrome\Application\chrome.exe-disable-prompt-on-repost

Step 3: Close Chrome and reopen it using the shortcut to see whether the problem persists.

Method 8: Uninstall Spam/Adware Programs

To resolve this issue, I recommend that you remove any toolbars or adware from your computer. These programmes may have been the primary source of the error.

Step 1: To open the “Run” dialogue box, press the “Windows + R” keys together. Press Enter after typing “appwiz.cpl” in this box. The “Uninstall a Program” window will appear.

Step 2: Click the “Uninstall” button above to remove the recently installed programme. It will remove all of its components, and your system will function normally.

Step 3: Restart the computer and try once more.

Method 9: Clear Chrome Cache

The “Err_Cache_Miss” error might be caused by a faulty browser cache. Delete all surfing history and use Chrome to see if the page loads.

Step 1: To launch Clear Browsing Data, press Control + Shift + Delete in Windows or Command + Shift + Delete on Mac Chrome.

Step 2: Go to the Basic tab and choose All time as the time range, as well as the cookies and cache data checkboxes

Step 3: To remove all history data, click the Clear Data option.

Step 4: Restart your browser to see if the website is again available.

Method 10: Make Use Of Developer Tools

You may also disable caching using the developer tool to fix the problem:

Step1 : Open Google Chrome first.

Step 2: Select “View, Developer, and Developer Tools.” OR

Step 3: You may also open Developer Tools by right-clicking and selecting “Inspect.” OR

Step 4: Hit CTRL + Shift + I, then press F1 to bring up Chrome Developer Tools.

Step 5: In the Network section of the Preferences window, select Disable caching (while DevTools is active). Take a look at this item. and then use those options.

Step 6: Simply refresh the website to see if all of the previously visible entries in the Network tab have vanished.

Step 7: Reload the page to see if the problem has been resolved.

Method 11: Reset Network Settings

The problem might also be caused by improper network settings. To reset these settings, you may need to launch Command Prompt.

Step 1: Press the Window and X keys together to bring up a context menu in the lower-left corner of your screen, immediately above the start button.

Step 2: In the result, right-click Command Prompt and choose Run as administrator.

Step 3: In Command Prompt, type the following commands. (It’s important to remember to hit Enter after each line and before moving on to the next.)

netsh int ip set dns ipconfig /release ipconfig /all ipconfig /flushdns ipconfig /renew
reset winsock netsh

Step 4: Once you’ve finished, restart your computer to see if the problem has been resolved.

Read Also:

  1. Err_Connection_Reset
  2. LookMovie
  3. ERR_INTERNET_DISCONNECTED

Conclusion

If the issue persists after you’ve tried all of the procedures listed above, you’ll need to power cycle the network device. Do not simply turn it off and then on again. You must turn it off, disconnect the power line from the router, wait a few minutes, reconnect the wires, and then turn it back on. It will fix any momentary issues in web operations when obtaining sites.

How To Fix ‘ERR_NETWORK_CHANGED’ Error In Chrome

On Google Chrome, the ERR_NETWORK_CHANGED error appears. It occurs when the internet connection or browser prevents the website from loading. The error message indicates that Chrome is unable to connect to the network, resulting in the error.

When an error occurs, the error message looks like this: I’m unable to connect to the internet. ERR_NETWORK_CHANGED or Your connection has been lost It was discovered that the network had altered. Make sure your internet connection is working.

Error

Understanding ERR_NETWORK_CHANGED:

ERR_NETWORK_CHANGED is a common error message encountered by Chrome users when their browser cannot establish a stable network connection to access websites.

This error may manifest as a webpage not loading or being unable to connect to certain sites. It often leaves users frustrated, wondering why they’re suddenly unable to access the internet.

Read Also:

  1. 0XC0000005
  2. Torlock
  3. ERR_NAME_NOT_RESOLVED

Causes of ERR_NETWORK_CHANGED:

Several factors can trigger the ERR_NETWORK_CHANGED error in Chrome. Understanding these causes is crucial to effectively troubleshooting the issue:

  1. Network Configuration Changes: One of the most common triggers is changes in network configurations, such as switching from Wi-Fi to a wired connection or vice versa. This transition can disrupt the network connection momentarily.
  2. VPN or Proxy Issues: If you use a VPN or a proxy server to browse the internet, it can interfere with network stability and trigger the error.
  3. Network Adapter Problems: Faulty or outdated network adapter drivers can lead to connectivity issues and result in ERR_NETWORK_CHANGED.
  4. DNS Cache and IP Address Conflicts: Outdated DNS cache or IP address conflicts can disrupt Chrome’s ability to resolve website addresses.
  5. Firewall and Security Software: Overly aggressive firewall settings or security software can block Chrome’s access to the internet.
  6. Browser Cache and Cookies: Accumulated browser cache and cookies can sometimes cause network-related problems.

How to Fix Chrome’s ERR_NETWORK_CHANGED Error

This mistake has affected a number of websites, including Google, Gmail, Facebook, YouTube, and others. Until the problem is rectified, you won’t be able to use Chrome.

This mistake can be caused by a number of things, thus there are a number of ways to fix it. Here are a few approaches that may assist you in resolving your problem.

Method 1: Turn Off and On Your Modem

The ERR_NETWORK_CHANGED error might occur when the modem is malfunctioning. Simply rebooting the modem will fix the problem.

The network may occasionally have technical issues that can only be resolved by rebooting the modem. If the ERR_NETWORK_CHANGED problem still persists, proceed to the next step.

Method 2: Reset TCP/IP and Flush DNS

Here’s how to fix the problem by changing DNS settings and resetting the TCP/IP protocol.

Step 1: Right-click on the Windows Button and select Properties.
Step 2: Select “Administrative Command Prompt.”
Step 3: In the elevated command prompt, type the following commands and hit Enter after each one.
/release ipconfig

/flushdns ipconfig

/renew ipconfig
Return to the elevated command prompt. Type the following commands, then press Enter after each one.
/flushdns ipconfig

nbtstat –r nbtstat –r nbtstat –

int ip reset netsh

reset winsock netsh
Step 4: Restart the machine to put these modifications into effect.

After that, Chrome’s ERR_NETWORK_CHANGED should be fixed. If it still isn’t repaired, try a different approach.

Method 3: Clear Chrome’s Browsing Data

Clearing Chrome’s browsing data is another option for resolving this issue. Clearing browsing data is a straightforward process. You may delete your internet history by pressing Ctrl + Shift + Delete.

Another option for deleting browsing data is to: –

Step 1: Go to Chrome’s start menu.
Step 2: Select the menu option in the upper right corner.
Step 3: There’s a history button there.
Step 4: Select Clear Browsing Data from the drop-down menu.
Step 5: Mark the following items:
History of browsing
History of downloads
Cookies, as well as data from other sires and plugins
Images and files cached
Data from the form is automatically filled in.
Passwords
Step 6: Restart your computer.

And that’s the end of it.

Method 4: Use Google DNS

Step 1: Navigate to the Control Panel.
Step 2: Select Network and Internet from the drop-down menu.
Step 3: Choose the Network and Sharing Center.
Step 4: Change the adapter settings by clicking on it.
Step 5: Choose your Wi-Fi network, then right-click it and select Internet Protocol Version 4 (TCP/IPv4).
Choose Properties.
Step 6: Select “Use the following DNS server addresses” and fill up the following information:
8.8.8.8 is the preferred DNS server.
8.8.4.4 is an alternative DNS server.

And that’s it.

Method 5: Untick the Proxy box.

Step 1: Press the Windows Key + R at the same time.
Step 2: Type “cpl” and press Enter to open Internet Properties.
Step 3: Select the Connections option from the drop-down menu.
Step 4: Choose your LAN settings.
Step 5: You’ll have to uncheck the box. For your LAN, use a proxy server.
Step 6: Make certain that “Automatically detect settings” is selected.
Step 7: Then click Ok, then Apply, and reboot your computer.

And that’s the end of it.

Method 6: WebGL Hits a Roadblock

ERR NAME NOT RESOLVED

This website can’t be accessed.

Method 7: Reinstall Your Network Adapter Drivers

Step 1: To access the device manager, click on the device manager icon. To open the command prompt, press Windows Key + R, then type “msc” and press Enter.
Step 2: Expand network adapters to find the name of your network adapter.
Step 3: It’s a good idea to write down the adapter’s name in case something goes wrong.
Step 4: Remove the network adapter from your computer.
Step 5: For confirmation, select Yes/OK.
Step 6: Restart your computer.
Step 7: Reconnect to your network if possible.
You will be unable to connect to your network if the driver software is not automatically installed.
In this scenario, you must go to your manufacturer’s website and download the appropriate driver.
Restart your computer after installing the driver.

Method 8: Delete WLAN Profiles

To do so, hit Windows Key + X and then select Command Prompt (Admin).
In the cmd, type “netsh wlan show profiles” and press Enter.
Remove all WIFI profiles with the netsh wlan delete profile name=”[PROFILE NAME]” command.
After that, try reconnecting to your WIFI.

And that’s it.

Read Also:

  1. ERR_INTERNET_DISCONNECTED
  2. Err_Connection_Reset
  3. Io.Netty.Channel.AbstractChannel$AnnotatedConnectException

Conclusion

I hope these techniques assist you in fixing your problem. This error can occur for a variety of reasons. So, if one strategy does not work, keep trying new ones.

Fix Windows Update Error ‘0x80240034’

You may face the issue of Update Error 0x80240034 while updating your windows. The windows team comes up with new updates regularly. It makes your system work smooth and fast.

Therefore, considering OS health, windows updates are very important. But many times, you face the issue like Error 0x80240034. Yes, it’s irritating to get this error while updating.

So, in this article, we are listing some methods to overcome this issue. Read the steps carefully and apply them one by one.

0x80240034

How to Fix Windows Update Error 0x80240034?

Let’s checkout our solutions mentioned below in order to fix the Windows update error 0x80240034. So let’s have a look on them.

Read Also:

  1. Err_Cache_Miss
  2. ERR_NETWORK_CHANGED
  3. ERR_NAME_NOT_RESOLVED

Method 1: Run the Update Troubleshooter

Windows has some in-built applications to troubleshoot update issues. Try this update troubleshooter first. Follow the steps below to run the update.

Step 1: At first press the key Windows + I to open settings. You can also search it in the taskbar.

Step 2: Further click on the Update & Security tab.

Step 3: Here you will see troubleshoot option in the left panel. Click on it.

Step 4: Alright, now from the right-hand side search the windows update title.

Step 5: Now under that, you will see the Run the troubleshooter button. Click on it.

Step 6: Finally restart your PC.

Method 2: Scan the System File Using the SFC Command

There may be some corrupt files in the system. SFC command will help you to fix those files.

Step 1: Firstly, you have to search for the command prompt in your search window.

Step 2: After that write “sfc/scannow” this text and click on the enter button.

Step 3: This process takes some time. Wait for it to complete.

Step 4: The system will automatically apply the solution if, found.

Step 5:  Finally close the window and restart your system.

Check if it’s working for you. Otherwise, go to the next solution.

Method 3: Perform DISM Scan

DISM is one more in-built technique to find and solve missing files.

Step 1: At first open your command prompt window. Run as an admin.

Step 2: Here write the command “DISM /Online /Cleanup-Image /CheckHealth”.

Step 3: It will take some time. Wait till the process finish.

Step 4: Afterwards, write the next command “DISM /Online /Cleanup-Image /ScanHealth”.

Step 5: It may take a longer time to complete. Do not shut down the system or don’t close the command prompt window. Wait till the process finish.

Step 6: Further, write the command “DISM /Online /Cleanup-Image /RestoreHealth”.

Step 7: This was the last step. Wait for the process to be completed.

Method 4: Download the Pending Updates Manually

You can download the pending updates manually. This process can solve the issue of update error 0x80240034. First, you need to find out the KB number of your system by visiting the official site. Follow the steps to do it.

Step 1: At first, visit the Microsoft Update Catalog website.

Step 2: Further type the KB number in the search box and then hit the enter key.

Step 3: Here you will see a list of updates. Choose the one update as per your system’s design.

Step 4: Finally, click on the update. Download setup files and then install them.

Step 5: Now, restart your PC.

Method 5: Clear Windows Update Cache/Distribution Folder

There might be some cache files stored in the Distribution Folder. These cache files also cause the  0x80240034 error while updating the windows. Clear these files to solve this issue. Follow the steps to clear the cache files.

Step 1: At first press the key windows + S to open the search bar.

Step 2: Now, search for the Command prompt, right-click on the results and run as an administrator.

Step 3: Further, on the UAC prompt click on the yes button.

Step 4: Alright, now write the command ‘net stop wuauserv’ and hit the enter button.

Step 5: After that run the command  ‘rmdir %windir%\SoftwareDistribution /S /Q’ and click on the enter button.

Step 6: Great! Now run the last command ‘net start wuauserv’ and hit the enter button.

Step 7: Finally install the pending updates.

Method 6: Reset the Updates Components

Sometimes the 0x80240034 error can be caused because of corruption in the Updates components. You can solve this issue by resetting the updated components. To do this follow the steps below.

Step 1: At first, type cmd in the search box on the taskbar. Now, it will suggest you command prompt.

Step 2: Here right-click on the command prompt and select the option run as administrator.

Step 3: Now, you will see UAC prompt, click on yes to grant the permission.

Step 4: Alright, now write the code ‘net stop wuauserv’ and press the enter button.

Step 5: Here, type the next code ‘net stop cryptSvc’, and click the enter button.

Step 6: Now, you need to the run next command here. Type ‘net stop bits’ and click the enter button.

Step 7: Good! You have to run some more commands. Type ‘net stop msiserver’ and press the enter button.

Step 8: This is the next command ‘rmdir %windir%SoftwareDistribution /S /Q ’.

Step 9: Alright now, type ‘net start wuauserv’ and press the enter button.

Step 10: Now, type the next command ‘net start cryptSvc’, and hit the enter button.

Step 11: Just two more commands to complete the task. Type ‘net start bits’ and press the enter button.

Step 12: Great! This is the last command ‘net start msiserver’ type this and hit the enter button.

Step 13: Finally, restart your system.

Method 7: Update Windows via ISO File

If you are still struggling with the problem, this method might help you. ISO file uses the windows updates client to solve the issue.

Step 1: At first, visit the official site of Microsoft and click on the Update now tab.

Step 2: Further click on the ISO setup file. You will get it in a recent folder.

Step 3: Now, if the system is prompting with the User Account Control window, click on the yes button.

Step 4: Here, click on the update now button, on the Windows 10 Update Assistant wizard.

Step 5: Now, click on the Next button.

Step 6: Alright, now your system will scan the performance. Then it will start updating the OS. Kindly wait here. Let the process complete.

Step 7: There might be some windows prompting you to take some actions to complete the process.

Step 8: Finally, restart your system.

Read Also:

  1. ERR_CONNECTION_CLOSED
  2. ERR_INTERNET_DISCONNECTED
  3. ERR_SSL_VERSION_INTERFERENCE

Conclusion

We hope these steps will solve your issue but if the issue persists, perform the clean install of Windows 10. But before that take a backup of your important files.

How To Fix ‘CompatTelRunner.exe’ High CPU And Disk Usage

The CompatTelRunner file is part of the Microsoft Windows Operating System, and it’s used to perform diagnostics to see if there are any compatibility problems.

When installing the latest version of the OS, it also collects application telemetry data for Microsoft to assure compatibility. Although useful, the procedure slows down your PC by consuming storage bandwidth as well as a lot of CPU and disc space.

Alternatives

Although this procedure is not required, and your computer can update without it, it does assist Microsoft in diagnosing your machine and running compatibility checks, making it a very valuable procedure.

You also can’t change the file because it’s in the System32 folder, owned by TrustedInstaller, and has read-only permission, thus attempting to change it would result in a ‘Access refused’ error.

Nonetheless, we’ll go through three techniques for resolving the CompatTelRunner.exe High CPU and Disk Usage problem, which will result in lower CPU usage and, as a result, better PC performance.

Read Also:

  1. JustDubs
  2. Err_Cache_Miss
  3. ERR_NETWORK_CHANGED
  4. ERR_NAME_NOT_RESOLVED

Understanding CompatTelRunner.exe:

CompatTelRunner.exe, short for Compatibility Telemetry Runner, is a legitimate Windows system file that operates in the background to ensure that your computer remains compatible with software updates and new Windows versions.

It collects data about system performance, software and hardware compatibility, and other technical information, which helps Microsoft improve the Windows experience for users.

Causes of CompatTelRunner.exe High CPU and Disk Usage:

While CompatTelRunner.exe is a necessary process, several factors can contribute to its high CPU and disk usage issues:

  1. Scheduled Tasks: CompatTelRunner.exe often runs scheduled tasks, such as Windows updates and compatibility checks, which can temporarily increase its resource usage.
  2. Corrupted Files: Corrupted system files or update files can cause CompatTelRunner.exe to behave abnormally and consume excess CPU and disk resources.
  3. Software Conflicts: Third-party software or security programs can interfere with CompatTelRunner.exe, leading to resource-intensive behavior.
  4. Inefficient Updates: If Windows updates are not installed properly or are incomplete, CompatTelRunner.exe may repeatedly attempt to process them, resulting in high resource usage.
  5. Malware or Virus: In some cases, malware or viruses can disguise themselves as CompatTelRunner.exe, causing it to use CPU and disk resources maliciously.

CompatTelRunner.exe can be fixed in two ways. CPU and disc use are both high.

Method 1: Take control of CompatTelRunner.exe and then Delete it.

Taking control of the file and then deleting it afterwards is a simple approach to deal with the matter, but you’ll need to log in to your computer as an administrator to do it. Then follow the instructions outlined below.

Step 1: Open the Start menu and search for “compattelrunner.exe” in the search box.

Step 2: Look for a file called ‘compattelrunner’ in the results. Simply right-click on it and select ‘Open file location.’

Step 3: You should now see a compattelrunner.exe file in the folder. Go to properties by right-clicking on it.

Step 4: In the properties box, click the ‘Advanced’ button under the ‘Security’ tab. Go to the ‘Ownership’ option in the Advanced box and select ‘change owner.’

Step 5: Select the account you’re presently using from the list of new possible owners and click OK. As directed, carry out the procedure.

Step 6: To alter the permission settings, repeat steps 1 through 3 and then choose the ‘Advanced’ button in the security page.

Step 7: Select ‘Permission’ from the window, then the account you’re presently using.

The Permission window occurs in Step 8. Under the allow column, pick ‘full control’ and then ‘apply.’ You will now be the file’s owner.

Because you now own the file, you can remove it if you choose, resolving the issue without any ‘Access denied’ alerts. It usually works; however, if it doesn’t, you can move on to the next step.

Method 2: Use Task Scheduler to Disable CompatTelRunner.exe.

This approach is straightforward and entails disabling the file that is responsible for the CompatTelRunner.exe High CPU and Disk Usage problem.

Step 1: In the Run dialogue box, type ‘taskschd.msc’ and press Enter to launch the Task Scheduler.

Step 2: Expand the Task Scheduler Library and then navigate to the Microsoft section, where you’ll find Windows.

Step 3: Open Application Experience and disable Microsoft Compatibility Appraisal by right-clicking on it and selecting ‘disable’.

You can then disable CompatTelRunner.exe and the problem will be resolved.

Some Easy Methods to Fix CompatTelRunner.exe High CPU and Disk Usage:

Here are some effective methods to troubleshoot and resolve CompatTelRunner.exe’s high CPU and disk usage problems:

  1. Disable Scheduled Tasks:
    • Open the Windows Task Scheduler and navigate to “Task Scheduler Library > Microsoft > Windows > Application Experience.” Disable or delete any tasks related to Microsoft Compatibility Appraiser or CompatTelRunner.exe.
  2. Run SFC and DISM Scans:
    • Open Command Prompt as an administrator and run the “sfc /scannow” command to scan and repair corrupted system files. Follow it up with a “DISM /Online /Cleanup-Image /RestoreHealth” command.
  3. Clear SoftwareDistribution Folder:
    • Navigate to “C:\Windows\SoftwareDistribution\Download” and delete the contents of this folder to remove any corrupted update files.
  4. Perform a Clean Boot:
    • Temporarily disable non-essential startup programs and services using the System Configuration utility. This can help identify software conflicts causing high CPU and disk usage.
  5. Check for Malware:
    • Perform a thorough malware scan using reputable antivirus or anti-malware software to rule out any malicious activities disguising as CompatTelRunner.exe.
  6. Update Windows:
    • Ensure your operating system is up to date by installing all available Windows updates, as these updates often contain bug fixes and performance improvements.
  7. Modify CompatTelRunner.exe Permissions:
    • Adjust the permissions for CompatTelRunner.exe to restrict its access to certain folders or actions, if necessary.
  8. Disable CompatTelRunner.exe:
    • As a last resort, if the issue persists, you can consider disabling CompatTelRunner.exe entirely, but this may affect system compatibility checks.

Read Also:

  1. Cartoon Crazy
  2. ERR_CONNECTION_CLOSED
  3. ERR_INTERNET_DISCONNECTED
  4. ERR_SSL_VERSION_INTERFERENCE

Conclusion

CompatTelRunner.exe, an essential component of the Windows operating system, serves a vital role in maintaining compatibility and stability. However, when it exhibits high CPU and disk usage issues, it can impact your computer’s performance.

By understanding the causes behind these problems and employing the methods outlined in this article, you can effectively address CompatTelRunner.exe-related performance issues and ensure a smoother computing experience.

Always exercise caution when modifying system files, and seek professional assistance if you encounter persistent problems or uncertainties while resolving CompatTelRunner.exe issues.